
Building an Interaction System Without Collision in UE5
- Billy Beanland

- Apr 24, 2024
- 6 min read

Over the last few months, a lot of my game dev work has been focused on level design for Always In Mind, which is being built in Unity. It's been an absolute blast working on these levels, and I'm looking forward to making more, but I've also been looking to up my skills in Unreal at the same time. So alongside my level design work, I decided to start a new solo project in UE5 to build up and refine my knowledge of blueprints and the other various tools in the engine. There's a bunch of different things I could cover already, but for now, I'm gonna stick with a challenge I set for myself; using blueprints to create an interaction system that doesn't require any kind of collision!
Goals
You might be asking why I wanted to set up interaction this way since collision is a fairly easy way to do it. Well the answer is right in that statement; it's easy. The biggest part of this challenge was to get myself to use new features in Blueprints that I hadn't really used before. On top of that, there were so many new features that I had recently discovered, and I wanted to find ways to use them for myself in a game. The best way for me to learn has always been a hands-on approach, so building a system that I had already done before, but in a different way was a task that I knew could push and excite me.
The Basics
For this project, I chose to start with the third-person template in UE5, as it's just the one I like best. As for starting the interaction system, it began like any other one I've built in the past; creating a parent class with the basic functionality that I need. This way, it's easy to give every interactable a set of rules and logic that they all follow. From there, I listed out the key features that I wanted/needed to include if I wasn't using collision;
Determining if the player character is close enough to interact
Only allow interaction if the player character is looking at the object in question
Make sure only one object can be interacted with at a time
Properly communicating that you can interact with an object
Truth be told, without collision, it proved to be a bit challenging finding an efficient way to check all of this logic. Ultimately what I decided to do was check for my conditions on tick for each interactable, which I know might not be the most efficient method, but again, this was more about challenging myself to learn about new blueprint features. I may try to find other methods of achieving this in the future, but for now, this will work for my learning.
Determining Interact Conditions
Addressing my first two features, I needed to build out the logic for when an object can be interacted with (the player character is in range and looking at the object). For this, I decided to turn to a new type of blueprint I hadn't used before; Function Libraries. I figured that these two things could be pretty useful if I decided to build any other systems afterwards, so putting them in a place where any BP could access them would mean that I don't have to rebuild the same logic in different places.


Checking if the player character is near an object was pretty simple; subtract their location from that of the object in question, then see if the length of that vector is less than a set amount of distance. As for checking if the player is looking at the object, this was something I initially struggled with, as I wanted to have a cone shape in front of the player that checked their forward view. I tried a few different methods at first, but they either didn't work or only did if the camera itself wasn't looking at the objects. Through a bit more experimentation though, I did eventually find a solution. Instead of a cone, I went with a Capsule Trace By Channel that starts right in front of the player character, and ends at a set amount of distance ahead of them. After that, it's just a matter of checking if this was the object that called the function.
Now this could give us the scenario of "what if something is right next to the object that could theoretically block that capsule trace." Theoretically, I could instead do a Multi Capsule Trace By Channel that checks each object in the hit array, but considering that this trace is happening on tick, I felt this is where I should employ a design choice to avoid taxing the code more. This would just be a matter of placing objects in a way that never allows for an interactable to be blocked if it's in range.
Responding To Conditions
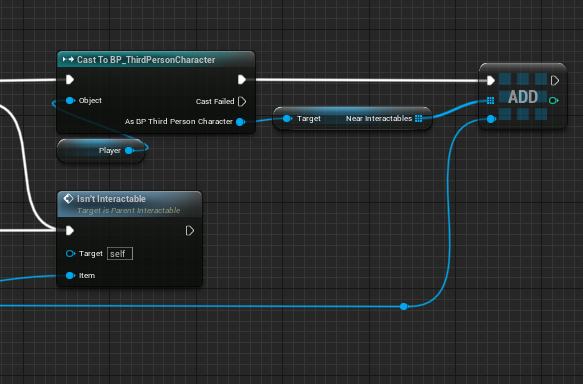
Now that we have the logic, we need to tell objects how to respond in both true and false cases. For both, this is where we start talking to the player character more directly. On that character is an array of object references for our parent class. When both of our previous conditions are met, we simply add the object in question to that array. If it's false, then we take it out.


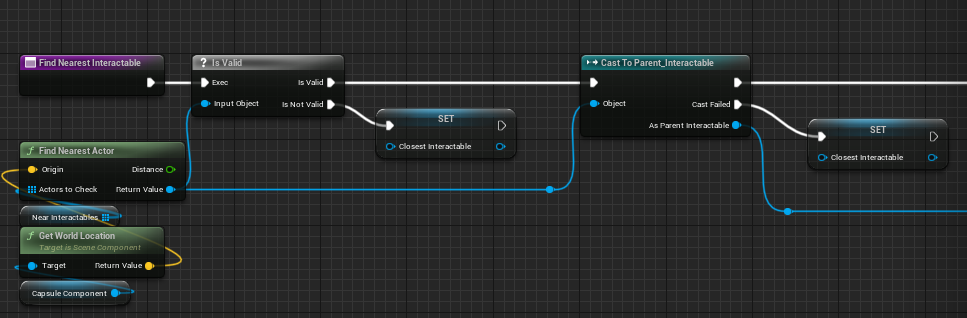


Now's where we migrate over the player character BP, cause I'm sure there are a few people that are asking what this array is actually for. Well the answer lies with our third key feature that we outlined; making sure only one object can be interacted with at a time. Once again, we'll be conducting our logic on tick, but unlike the risks with using an array for the capsule trace, we don't need to run a "for each loop." Instead, we just want to find the closest object to our player character. Once we have that, we do a check to make sure that value is valid (in the case of not being near any objects), and if it is, we assign it to another variable on the player that is always the closest interactable. During that assigning, we also want to make sure there isn't an object already assigned to that variable, especially if we're not near any objects.
So now that we have our closest interactable object, how do we properly communicating that you can interact with it? For the time being, I decided to go a bit simple with this by setting up an arrow that appears just above whatever object is assigned as the closest interactable. If they're the one, the arrow becomes visible when you meet the conditions, and will disappear when you don't. Again, it's a fairly simple approach, but I put it together in a way that makes it pretty easy to make it look better later on.
Triggering The Interaction

Now that all of those pieces are put together, it's time to actually trigger the interaction on the player character. To do that, a new enhanced input action is created for our interact key. When pressed, the BP looks for if the closest interactable is assigned, and if it is, we trigger a custom event on the interactable. And from there, the last thing we do on the parent class is call the set interactable function before we're able to create our unique children.
The Final Product
And here we have it, an interaction system that not once uses collision. As an example to show the interactions, I put together some child actors that draw from the parent class; a door that you can open, and a button that will call another function on another BP (more on those and this custom character in future blogs).

Again, I'm uncertain if this is the most efficient way to create an interaction system, but like I said at the top, this challenge wasn't completely about efficiency. It was more for exposing me to new parts of UE5, and I think it was really successful. Function libraries were something I had never touched before, and getting to use them here was really great. Not to mention the future features I can build with the functions in there. It also taught me that there's more than line tracing to detect hits, which came in so handy when I was making the look at function.
So that about wraps up this UE5 challenge. I've had a lot of motivation for making new stuff in here, so I'm hoping I can build more that I can share soon. Be on the lookout!

Comments